ProLoc:Ajouter une inscription : Différence entre versions
(→Ajouter une inscription à partir de la fiche d'un client) |
|||
| Ligne 1 : | Ligne 1 : | ||
{{Entete_ProLoc|1|1|Geneviève Guérard||2015-02-17}} | {{Entete_ProLoc|1|1|Geneviève Guérard||2015-02-17}} | ||
| − | == Ajouter une inscription == | + | == Ajouter une inscription == |
Il est possible d'ajouter une inscription à partir de deux endroits. | Il est possible d'ajouter une inscription à partir de deux endroits. | ||
| Ligne 12 : | Ligne 12 : | ||
|- | |- | ||
| colspan="2" | | | colspan="2" | | ||
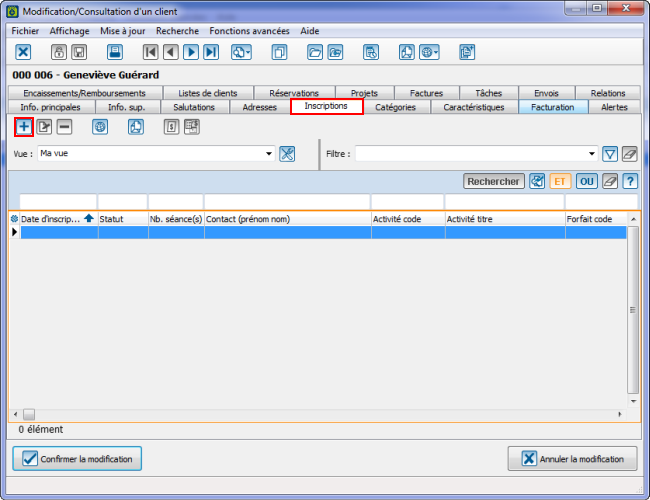
| − | Pour ajouter une inscription à partir de la fiche d'un client, il faut | + | Pour ajouter une inscription à partir de la fiche d'un client, il faut aller dans la gestion des clients, faire une recherche pour trouver le client en question et faire un double clic sur sa fiche pour l'ouvrir. |
| − | Une fois la fiche ouverte, il faut aller dans l'ongelt « Inscriptions » et cliquer sur « [[Image: | + | Une fois la fiche ouverte, il faut aller dans l'ongelt « Inscriptions » et cliquer sur « [[Image:Bouton Ajouter.png]] Ajouter une inscription ». |
| + | |||
| + | '''Note:''' La disposition des onglets peut varier d'un utilisateur à l'autre. | ||
|- | |- | ||
| − | | colspan="2" | [[Image: | + | | colspan="2" | [[Image:Ajouter Inscription 001.png]]<br> |
|} | |} | ||
| − | |||
| − | |||
| − | == Ajouter une inscription à partir d'un forfait == | + | === Ajouter une inscription à partir d'un forfait === |
<br> | <br> | ||
| Ligne 30 : | Ligne 30 : | ||
{| width="200" cellspacing="1" cellpadding="1" border="1" class="wikitable" | {| width="200" cellspacing="1" cellpadding="1" border="1" class="wikitable" | ||
|- | |- | ||
| − | | colspan="2" | | + | | colspan="2" | |
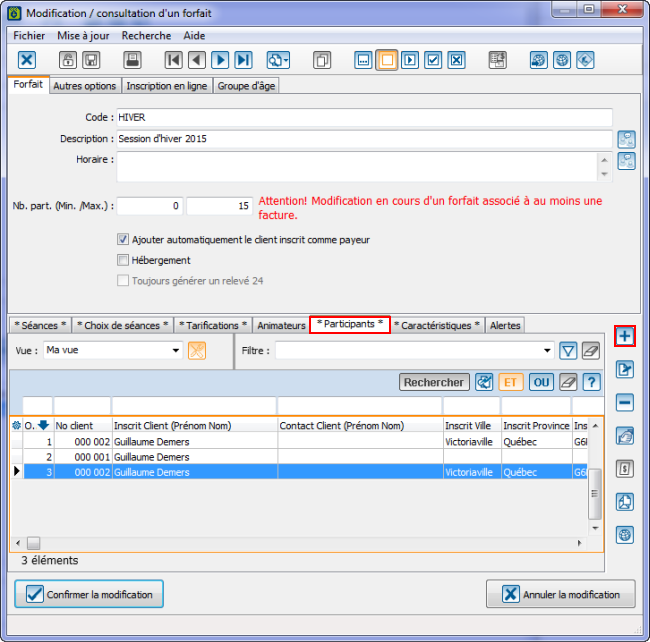
| − | + | Pour ajouter une inscription à partir d'un forfait, il faut aller dans la gestion des activités et faire un double clic sur l'activité pour l'ouvrir. Il faut ensuite faire un double clic sur le forfait en question pour l'ouvrir. | |
| − | + | ||
| − | + | Une fois le forfait ouvert, il faut aller dans l'onglet « Participants » et cliquer sur « [[Image:Bouton_Ajouter.png]] Ajouter une inscription ». | |
| − | + | ||
| − | |||
| − | |||
| − | |||
| − | |||
| − | |||
| − | |||
| − | |||
| − | |||
| − | |||
| − | |||
| − | |||
| − | |||
| − | |||
|- | |- | ||
| − | | | + | | colspan="2" | [[Image:Ajouter_Inscription_002.png]]<br> |
| − | |||
| − | |||
| − | | | ||
| − | |||
|} | |} | ||
<br> | <br> | ||
| − | + | <br> <br> | |
| − | <br> | ||
{| width="200" cellspacing="1" cellpadding="1" border="1" class="wikitable" | {| width="200" cellspacing="1" cellpadding="1" border="1" class="wikitable" | ||
| Ligne 67 : | Ligne 49 : | ||
| colspan="2" | <br> | | colspan="2" | <br> | ||
|- | |- | ||
| − | | width="50%" | <span style="color: rgb(255, 0, 0);">'''A:'''</span> P | + | | width="50%" | <span style="color: rgb(255, 0, 0);">'''A:'''</span> P |
| '''<span style="color: rgb(255, 0, 0);">B: </span>'''P | | '''<span style="color: rgb(255, 0, 0);">B: </span>'''P | ||
|- | |- | ||
| Ligne 77 : | Ligne 59 : | ||
|- | |- | ||
| <span style="color: rgb(255, 0, 0);">'''G:'''</span> P<br> | | <span style="color: rgb(255, 0, 0);">'''G:'''</span> P<br> | ||
| − | | <span style="color: rgb(255, 0, 0);">'''H:'''</span> P | + | | <span style="color: rgb(255, 0, 0);">'''H:'''</span> P |
|- | |- | ||
| '''<span style="color: rgb(255, 0, 0);">I:</span>''' P<br> | | '''<span style="color: rgb(255, 0, 0);">I:</span>''' P<br> | ||
| Ligne 91 : | Ligne 73 : | ||
<br> | <br> | ||
| − | + | <br> <br> | |
| − | <br> | ||
{| width="200" cellspacing="1" cellpadding="1" border="1" class="wikitable" | {| width="200" cellspacing="1" cellpadding="1" border="1" class="wikitable" | ||
| Ligne 100 : | Ligne 81 : | ||
| colspan="2" | <br> | | colspan="2" | <br> | ||
|- | |- | ||
| − | | width="50%" | <span style="color: rgb(255, 0, 0);">'''A:'''</span> P | + | | width="50%" | <span style="color: rgb(255, 0, 0);">'''A:'''</span> P |
| '''<span style="color: rgb(255, 0, 0);">B: </span>'''P | | '''<span style="color: rgb(255, 0, 0);">B: </span>'''P | ||
|- | |- | ||
| Ligne 110 : | Ligne 91 : | ||
|- | |- | ||
| <span style="color: rgb(255, 0, 0);">'''G:'''</span> P<br> | | <span style="color: rgb(255, 0, 0);">'''G:'''</span> P<br> | ||
| − | | <span style="color: rgb(255, 0, 0);">'''H:'''</span> P | + | | <span style="color: rgb(255, 0, 0);">'''H:'''</span> P |
|- | |- | ||
| '''<span style="color: rgb(255, 0, 0);">I:</span>''' P<br> | | '''<span style="color: rgb(255, 0, 0);">I:</span>''' P<br> | ||
Version du 17 février 2015 à 16:34
Ajouter une inscription
Il est possible d'ajouter une inscription à partir de deux endroits.
Soit à paritir de la fiche du client que l'on souhaite inscrire ou encore à partir du forfait auquel on souhaite inscrire le client.
Ajouter une inscription à partir de la fiche d'un client
Ajouter une inscription à partir d'un forfait
| . | |
| | |
| A: P | B: P |
| C: P | D: P |
| E: P |
F: P |
| G: P |
H: P |
| I: P |
J: P |
| K: P |
L: P |
| M: C |
|
| . | |
| | |
| A: P | B: P |
| C: P | D: P |
| E: P |
F: P |
| G: P |
H: P |
| I: P |
J: P |
| K: P |
L: P |
| M: C |
|
Nom du document : ProLoc:Ajouter une inscription

