ProDon:Configuration d'un courriel (à traduire) : Différence entre versions
(Page créée avec « {{Entete_TOC}} '''IMPORTANT :''' Vous devez posséder le module « '''Processus automatisés''' » pour avoir accès à ces fonctions. == Introduction == Afin de pouvo... ») |
(→Email configuration) (Balise : Éditeur visuel) |
||
| (2 révisions intermédiaires par le même utilisateur non affichées) | |||
| Ligne 1 : | Ligne 1 : | ||
{{Entete_TOC}} | {{Entete_TOC}} | ||
| + | Title: Email configuration | ||
| − | '''IMPORTANT :''' | + | '''IMPORTANT:''' You must have the "'''Automated processes'''" module to access these functions. |
== Introduction == | == Introduction == | ||
| − | + | In order to send emails to clients, you need to configure one or more emails. | |
| − | == | + | == Email configuration == |
| − | + | Open the automated process for which an email is to be configured. | |
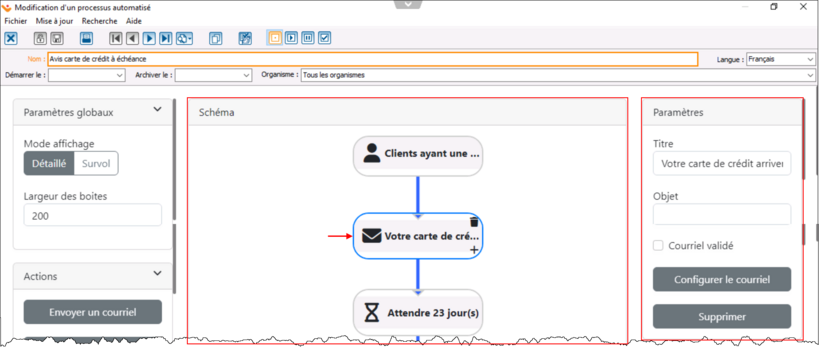
| − | + | In the diagram, configure the various emails based on the actions identified by an envelope. | |
| − | + | Click on an action to access its settings from the "Settings" section on the right. | |
| Ligne 19 : | Ligne 20 : | ||
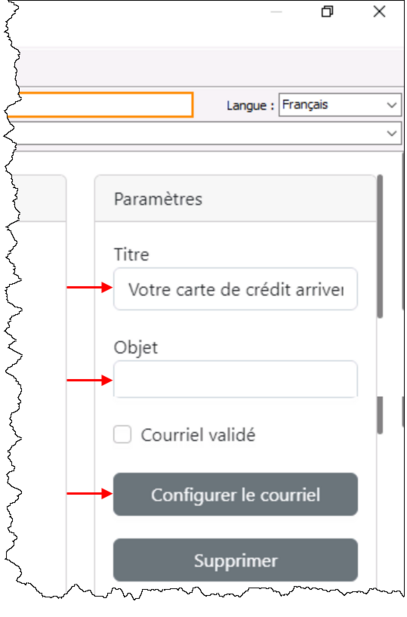
| − | + | You will then be able to modify the "Title" of your campaign, as well as the "Subject" of the email that will be sent. | |
| − | + | Then click on "Configure email" to access the Courrielleur. | |
| Ligne 27 : | Ligne 28 : | ||
| − | + | Email configuration is the same as for the Email Blast module. | |
| − | + | To find out how to set up an email in the Courrielleur interface, see "Setting up emails from Courrielleur" in the training plan.(le [http://doc.logilys.com/formation/PubliCourriel.pdf plan de formation]). | |
| − | + | When you have finished configuring your email, click on "Save". | |
| − | + | Close the Courrielleur page, then return to your application. | |
| − | + | You can make changes to the email at any time by clicking on the "Configure email" button again. | |
| − | '''NOTE:''' | + | '''NOTE:''' You do not need to synchronize the email with Prodon. Changes made on the Courrielleur are automatically synchronized with your automated process. |
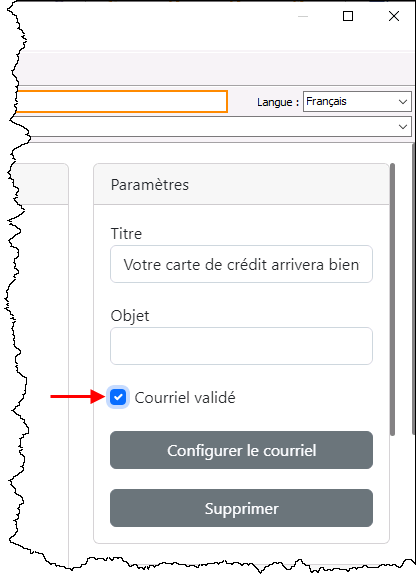
| − | + | When email configuration is complete, check the "Email validated" box. | |
| Ligne 47 : | Ligne 48 : | ||
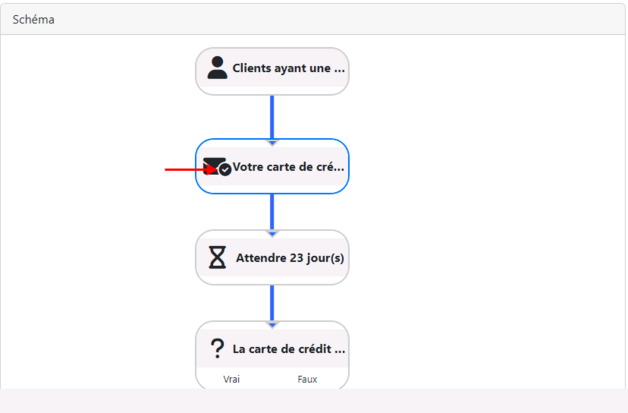
| − | + | The "Send email" action in the diagram will then have a checkmark on the envelope, telling you that configuration of this action is complete. | |
| Ligne 53 : | Ligne 54 : | ||
| − | + | It will not be possible to start a process until all emails have been validated using the "Email validated" checkbox. | |
| − | == | + | == Email mailing management == |
| − | + | Once an email has been validated, the emails sent by the automated processes can be found in the "Email mailing management" section. | |
| − | + | Go to "Email mailing management" (menu "Mailings", "Email Blast", "Mailings"). | |
| − | + | The name of the emails sent by automated processes will begin with "Automation". | |
{{BasPage_ProDon_Version|5.0.14}} | {{BasPage_ProDon_Version|5.0.14}} | ||
Version du 20 décembre 2024 à 15:30
| Configuration d'un courriel (à traduire) |
Title: Email configuration
IMPORTANT: You must have the "Automated processes" module to access these functions.
Introduction
In order to send emails to clients, you need to configure one or more emails.
Email configuration
Open the automated process for which an email is to be configured.
In the diagram, configure the various emails based on the actions identified by an envelope.
Click on an action to access its settings from the "Settings" section on the right.
You will then be able to modify the "Title" of your campaign, as well as the "Subject" of the email that will be sent.
Then click on "Configure email" to access the Courrielleur.
Email configuration is the same as for the Email Blast module.
To find out how to set up an email in the Courrielleur interface, see "Setting up emails from Courrielleur" in the training plan.(le plan de formation).
When you have finished configuring your email, click on "Save".
Close the Courrielleur page, then return to your application.
You can make changes to the email at any time by clicking on the "Configure email" button again.
NOTE: You do not need to synchronize the email with Prodon. Changes made on the Courrielleur are automatically synchronized with your automated process.
When email configuration is complete, check the "Email validated" box.
The "Send email" action in the diagram will then have a checkmark on the envelope, telling you that configuration of this action is complete.
It will not be possible to start a process until all emails have been validated using the "Email validated" checkbox.
Email mailing management
Once an email has been validated, the emails sent by the automated processes can be found in the "Email mailing management" section.
Go to "Email mailing management" (menu "Mailings", "Email Blast", "Mailings").
The name of the emails sent by automated processes will begin with "Automation".
Nom du document : ProDon:Configuration d'un courriel (à traduire)
Version : 5.0.14


