ProLoc:Produits : Différence entre versions
| Ligne 109 : | Ligne 109 : | ||
|- | |- | ||
| colspan="2" | [[Image:Produits 003.png]]<br> | | colspan="2" | [[Image:Produits 003.png]]<br> | ||
| + | |} | ||
| + | |||
| + | <br> | ||
| + | |||
| + | ==== Onglet Produits<br> ==== | ||
| + | |||
| + | {| cellspacing="1" cellpadding="1" width="200" border="1" class="wikitable" | ||
| + | |- | ||
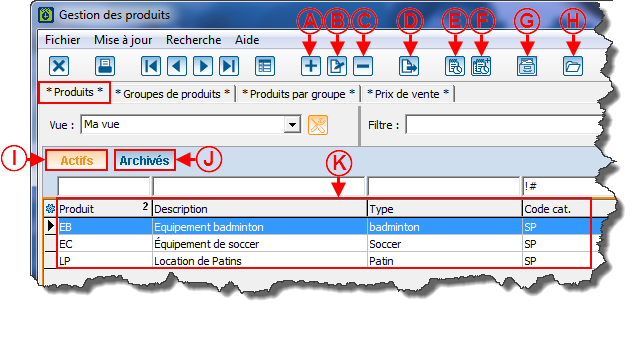
| + | | colspan="2" | Après avoir cliqué sur « [[Image:Produits001.png]] Produits », la fenêtre suivante s'ouvre. <br> | ||
| + | |- | ||
| + | | colspan="2" | [[Image:Produits_010.png]]<br> | ||
| + | |- | ||
| + | | width="50%" | <span style="color: rgb(255, 0, 0);">'''A:'''</span> Permet d'ajouter un produit. | ||
| + | | <span style="color: rgb(255, 0, 0);">'''B:'''</span> Permet de modifier ou de consulter le produit sélectionné dans la grille en <span style="color: rgb(255, 0, 0);">'''K'''</span>. | ||
| + | |- | ||
| + | | width="50%" | <span style="color: rgb(255, 0, 0);">'''C:'''</span> Permet de retirer un produit. | ||
| + | | <span style="color: rgb(255, 0, 0);">'''D: '''</span><span style="color: rgb(0, 0, 0);">Permet d'exporter la grille en K dans un fichier. </span> | ||
| + | |- | ||
| + | | width="50%" | <span style="color: rgb(255, 0, 0);">'''E:'''</span> Permet d'ouvrir le gestionnaire de tâches. <br> | ||
| + | | <span style="color: rgb(255, 0, 0);">'''F:'''</span> Permet de créer une tâche pour tous les produits visibles dans la grille en <span style="color: rgb(255, 0, 0);">'''K'''</span>.<br> | ||
| + | |- | ||
| + | | width="50%" | <span style="color: rgb(255, 0, 0);">'''G:'''</span> Permet d'archiver un produit. | ||
| + | | <span style="color: rgb(255, 0, 0);">'''H:'''</span> Permet d'ouvrir le dossier d'un produit. <br> | ||
| + | |- | ||
| + | | width="50%" | <span style="color: rgb(255, 0, 0);">'''I:'''</span> Permet d'afficher les produits actifs.<br> | ||
| + | | <span style="color: rgb(255, 0, 0);">'''J:'''</span> Permet d'afficher les produit archivés.<br> | ||
| + | |- | ||
| + | | width="50%" | <span style="color: rgb(255, 0, 0);">'''K:'''</span> Contien la liste des produits. <br> | ||
| + | | '''Note: '''Lorsque les onglets <span style="color: rgb(255, 0, 0);">'''I'''</span> et<span style="color: rgb(255, 0, 0);">''' J '''</span>sont bleus ou orangés tous les deux, tout leur contenu est affiché dans la grille en <span style="color: rgb(255, 0, 0);">'''K'''</span>. | ||
| + | Pour sélectionner ou désélectionner seulement un des deux onglets, il faut tenir la touche CTRL enfoncée et cliquer sur l'onglet à sélectionner. Lorsqu'il est orangé, l'onglet est actif et son contenu est affiché.<br> | ||
| + | |||
| + | |} | ||
| + | |||
| + | ===== <br>Ajouter un produit ===== | ||
| + | |||
| + | {| cellspacing="1" cellpadding="1" width="200" border="1" class="wikitable" | ||
| + | |- | ||
| + | | colspan="2" | Après avoir cliqué sur « [[Image:Produits001.png]] Produits », la fenêtre suivante s'ouvre. <br> | ||
| + | |- | ||
| + | | colspan="2" | <br> | ||
| + | |- | ||
| + | | width="50%" | <span style="color: rgb(255, 0, 0);">'''A:'''</span> P | ||
| + | | <span style="color: rgb(255, 0, 0);">'''B:'''</span> N | ||
| + | |- | ||
| + | | width="50%" | <span style="color: rgb(255, 0, 0);">'''C:'''</span>A | ||
| + | | <span style="color: rgb(255, 0, 0);">'''D: '''</span>C | ||
| + | |- | ||
| + | | width="50%" | <span style="color: rgb(255, 0, 0);">'''E:'''</span> V | ||
| + | | <span style="color: rgb(255, 0, 0);">'''F:'''</span> P<br> | ||
| + | |- | ||
| + | | width="50%" | <span style="color: rgb(255, 0, 0);">'''G:'''</span> N | ||
| + | | <br> | ||
| + | |} | ||
| + | |||
| + | ==== Onglet Groupes de produits<br> ==== | ||
| + | |||
| + | {| cellspacing="1" cellpadding="1" width="200" border="1" class="wikitable" | ||
| + | |- | ||
| + | | colspan="2" | <br> | ||
| + | |- | ||
| + | | colspan="2" | <br> | ||
|- | |- | ||
| width="50%" | <span style="color: rgb(255, 0, 0);">'''A:'''</span> P | | width="50%" | <span style="color: rgb(255, 0, 0);">'''A:'''</span> P | ||
| Ligne 124 : | Ligne 185 : | ||
<br> | <br> | ||
| + | |||
| + | ==== Onglet produits par groupe<br> ==== | ||
| + | |||
| + | {| cellspacing="1" cellpadding="1" width="200" border="1" class="wikitable" | ||
| + | |- | ||
| + | | colspan="2" | <br> | ||
| + | |- | ||
| + | | colspan="2" | <br> | ||
| + | |- | ||
| + | | width="50%" | <span style="color: rgb(255, 0, 0);">'''A:'''</span> P | ||
| + | | <span style="color: rgb(255, 0, 0);">'''B:'''</span> N | ||
| + | |- | ||
| + | | width="50%" | <span style="color: rgb(255, 0, 0);">'''C:'''</span>A | ||
| + | | <span style="color: rgb(255, 0, 0);">'''D: '''</span>C | ||
| + | |- | ||
| + | | width="50%" | <span style="color: rgb(255, 0, 0);">'''E:'''</span> V | ||
| + | | <span style="color: rgb(255, 0, 0);">'''F:'''</span> P<br> | ||
| + | |- | ||
| + | | width="50%" | <span style="color: rgb(255, 0, 0);">'''G:'''</span> N | ||
| + | | <br> | ||
| + | |} | ||
| + | |||
| + | <br> | ||
| + | |||
| + | ==== Onglet Prix de vente<br> ==== | ||
| + | |||
| + | {| cellspacing="1" cellpadding="1" width="200" border="1" class="wikitable" | ||
| + | |- | ||
| + | | colspan="2" | <br> | ||
| + | |- | ||
| + | | colspan="2" | <br> | ||
| + | |- | ||
| + | | width="50%" | <span style="color: rgb(255, 0, 0);">'''A:'''</span> P | ||
| + | | <span style="color: rgb(255, 0, 0);">'''B:'''</span> N | ||
| + | |- | ||
| + | | width="50%" | <span style="color: rgb(255, 0, 0);">'''C:'''</span>A | ||
| + | | <span style="color: rgb(255, 0, 0);">'''D: '''</span>C | ||
| + | |- | ||
| + | | width="50%" | <span style="color: rgb(255, 0, 0);">'''E:'''</span> V | ||
| + | | <span style="color: rgb(255, 0, 0);">'''F:'''</span> P<br> | ||
| + | |- | ||
| + | | width="50%" | <span style="color: rgb(255, 0, 0);">'''G:'''</span> N | ||
| + | | <br> | ||
| + | |} | ||
| + | |||
| + | <br> | ||
=== Escomptes === | === Escomptes === | ||
Version du 26 septembre 2014 à 14:34
Sommaire
Gestion des produits
Introduction
Unité de mesure
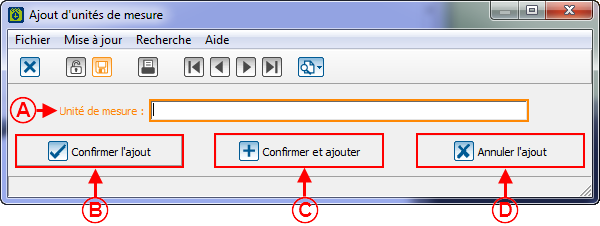
La gestion des unités de mesure permet de configurer....
| Pour y accéder, il faut aller dans le menu « Produits » et « | |
 |
| Après avoir cliqué sur « | |
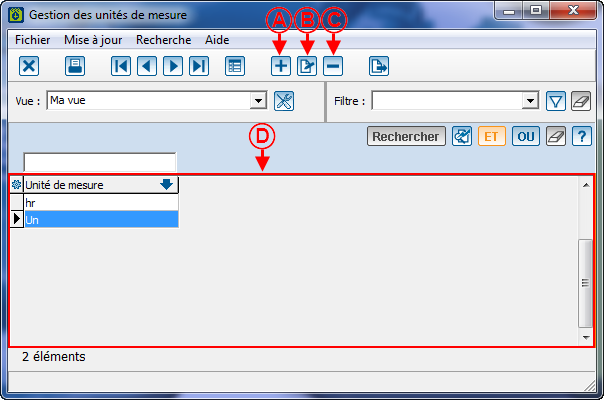 | |
| A: Permet d'ajouter une unité de mesure.Pour plus de détails sur l'ajout d'une unité de mesure, cliquer ici. |
B: Permet de modifier ou de consulter l'unité de mesure sélectionnée dans la grille en D. |
| C: Permet de retirer l'unité de mesure sélectionnée dans la grille en D. | D: Contien la liste des unités de mesures exsitantes. |
Ajouter une unité de mesure
Catégorie de produits
Les catégories de produits permettent de ....
| Pour y accéder, il faut aller dans le menu « Produits » et « | |
 |
| Après avoir cliqué sur « | |
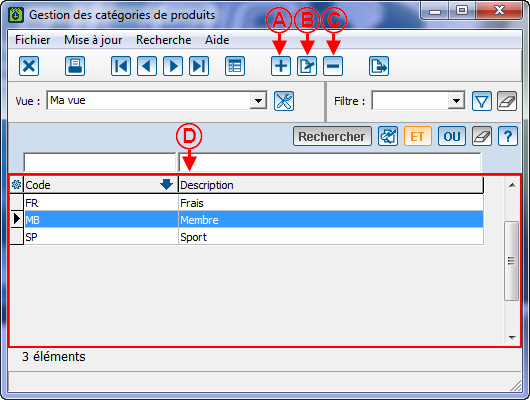 | |
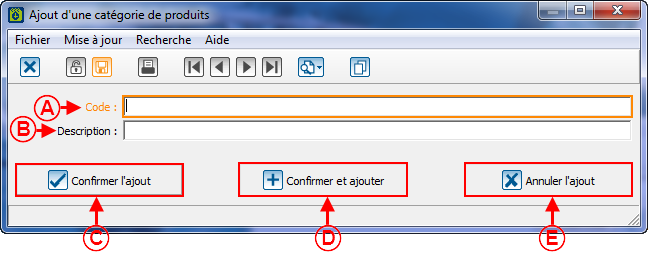
| A: Permet d'ajouter une catégorie de produits. Pour plus de détails sur l'ajout de catégories de produits, cliquer ici. |
B: Permet de modifier ou de consulter la catégorie de produits sélectionnée dans la grille en D. |
| C: Permet de retirer une catégorie de produits. | D: Contien la liste des catégories de produits. |
Ajouter une catégorie de produits
Produits
Les produits permettent de....
| Pour y accéder, il faut aller dans le menu « Produits » et « | |
 |
Onglet Produits
Ajouter un produit
| Après avoir cliqué sur « | |
| | |
| A: P | B: N |
| C:A | D: C |
| E: V | F: P |
| G: N | |
Onglet Groupes de produits
| | |
| | |
| A: P | B: N |
| C:A | D: C |
| E: V | F: P |
| G: N | |
Onglet produits par groupe
| | |
| | |
| A: P | B: N |
| C:A | D: C |
| E: V | F: P |
| G: N | |
Onglet Prix de vente
| | |
| | |
| A: P | B: N |
| C:A | D: C |
| E: V | F: P |
| G: N | |
Escomptes
| Pour y accéder, il faut aller dans le menu « Produits » et « Escomptes ». | |
 | |
| A: P | B: N |
| C:A | D: C |
| E: V | F: P |
| G: N | |
Liste de prix
| Pour y accéder, il faut aller dans le menu « Produits » et « Listes de prix ». | |
 | |
| A: P | B: N |
| C:A | D: C |
| E: V | F: P |
| G: N | |
----
Nom du document : ProLoc:Produits
